How to Test and Troubleshoot the Voltage Regulator on a Lawn Mower 2024
Are you facing the fact that your lawn mower is not starting properly and is running rough? It might be due to a defective or malfunctioning voltage regulator. A faulty voltage regulator not only creates a starting problem but also disturbs the whole electrical system of your lawnmower.
The voltage regulator is pivotal in a lawn mower’s electrical system, ensuring the battery receives a steady charge without being overpowered. Symptoms of a malfunctioning voltage regulator include a non-charging battery, dim or flickering lights, and an engine that runs unevenly or stalls. This article aims to provide a comprehensive guide on testing and troubleshooting the voltage regulator on a lawn mower.
Method 1: Testing the Voltage Regulator Through the Battery
Testing the voltage regulator through the battery is a straightforward and effective method to ascertain the health and functionality of a lawn mower’s charging system. This procedure involves using a multimeter to measure the battery’s voltage under different operating conditions. Here’s a step-by-step guide to performing this test accurately:
Tools and Safety Measures
Before starting the testing procedure, ensure you have a reliable multimeter, protective gloves, and a secure, flat workspace. Safety is essential; therefore, ensure the lawn mower is off and positioned securely to prevent accidents.
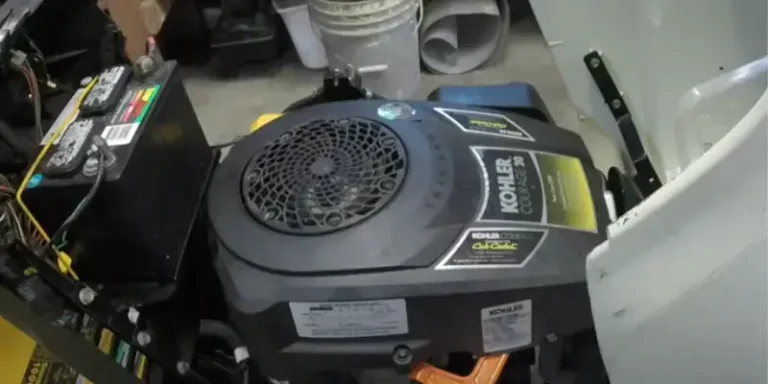
Identify the Battery and Voltage Regulator
Location: Start by locating your lawn mower’s battery and voltage regulator. These components are commonly found under the seat or within the hood area. The voltage regulator is typically a small rectangular or square box with wires leading to the battery and alternator.
Initial Voltage Check
Procedure: Using a multimeter set to measure voltage, connect the positive (red) probe to the positive terminal of the battery and the negative (black) probe to the negative terminal.
Expected Reading: A healthy, fully charged battery should display a voltage of around 12 volts. This initial reading provides a baseline for understanding the charging system’s performance.
Engine Test
Running the Engine: With the multimeter still connected, start the engine and adjust the throttle to a fast setting, which increases the revolutions per minute (RPMs). This action simulates the operating conditions under which the voltage regulator should actively manage the battery’s electrical charge.
Voltage Reevaluation
Observation: While the engine runs at a high RPM, observe the voltage reading on the multimeter again. The reading provides insight into the voltage regulator’s operation.
Expected Behavior: An operational voltage regulator typically causes the voltage to increase slightly, reaching about 14 volts. This increase indicates the regulator is successfully managing the charging process.
Analysis of Results
Functioning Correctly: An increase in voltage to approximately 14 volts suggests the voltage regulator and the charging system are functioning correctly. This level of voltage is ideal for charging the battery without risking overcharging.
Potential Issues: If the voltage reading remains the same, decreases, or shows erratic behavior, it could indicate problems with the voltage regulator or the alternator’s ability to generate sufficient power.
Overcharging Warning: Voltage readings significantly above 14 volts are a warning sign. They suggest the voltage regulator allows too much charge to enter the battery, which can lead to overcharging. Overcharging a battery can reduce lifespan and damage the lawn mower’s electrical system components.
By following this methodical approach, one can quickly determine the operational status of the voltage regulator through direct testing via the battery. It’s an important diagnostic test that can help identify issues early, ensuring the longevity and reliability of the lawn mower’s electrical system
Method 2: Testing the Voltage Regulator Directly at Its Terminals in Lawn Mowers
Testing the voltage regulator directly at its terminals is a more targeted approach to diagnosing issues with a lawn mower’s charging system. This method precisely assesses the regulator’s performance, independent of the battery’s state. Here’s how to conduct this test effectively:
Access and Disconnect the Regulator’s Wires
Location: First, locate the voltage regulator on your lawn mower. This component is usually mounted in a position that facilitates cooling, often near the engine or under the hood.
Disconnecting Wires: Carefully disconnect the wires from the terminals of the voltage regulator. Ensure the mower is off and the key is removed before doing so to prevent any electrical accidents.
Terminal Voltage Measurement
Initial Setup: Use a multimeter set to measure DC voltage with the wires disconnected. Attach the multimeter’s probes to the terminals on the voltage regulator. Note the polarity to ensure accurate readings.
Document Voltage: Record the initial voltage reading. In this state, without the engine running, the reading might be minimal or show the battery’s resting voltage if the regulator is internally connected to the battery.
Load Application
Engaging Electrical Load: Turn on the lawn mower’s headlights or other electrical accessories to apply a load to the electrical system. This simulates the demand on the charging system during operation.
Voltage Comparison
Observation Under Load: With the load applied, observe the voltage reading on the multimeter. This reading indicates how well the voltage regulator is responding to electrical demand.
Expected Performance: A functioning voltage regulator should output a steady voltage of around 14V, compensating for the load and ensuring the battery is charged efficiently.
Results Interpretation
Healthy Regulator: A consistent reading of approximately 14V under load suggests the voltage regulator operates as intended, effectively managing the charging system’s output.
Potential Malfunction: If the voltage reading is significantly low or near zero, it indicates a malfunctioning voltage regulator or possibly an issue with the alternator’s output. This situation requires further investigation to pinpoint the exact problem.
Overcharging Concern: Voltage readings above 14V raise concerns about the regulator overcharging the battery and electrical system. Overcharging can lead to battery damage and increased wear on electrical components.
One can isolate and assess its functionality by directly testing the voltage regulator at its terminals, providing clear insights into its condition. This method is invaluable for diagnosing charging system problems enabling targeted repairs that ensure the mower’s electrical system remains in optimal working order.
Advanced Troubleshooting and Replacement Tips: Lawn Mower Regulator Problem
Steps for Diagnosis
When dealing with a malfunctioning voltage regulator, it is critical to carefully examine the electrical system’s wiring, connections, and fuses. It takes a thorough inspection to find any indications of wear, damage, or looseness that could compromise the system’s integrity. This is the proper way to approach this important diagnostic stage:
Visual Inspection: Begin with visually examining all accessible wiring and connections. Look for any signs of damage, such as frayed wires, connection corrosion, or exposed conductive parts. Such issues can cause short circuits or poor connections that mimic or exacerbate voltage regulator problems.
Check for Loose Connections: Gently tug on each connection to ensure it’s secure. Loose connections can lead to intermittent electrical issues, which are often difficult to diagnose. A connection that moves easily is likely too loose and needs attention.
Examine the Fuses: Locate the lawn mower’s fuse box and inspect each fuse visually or with a multimeter for continuity. A blown fuse can indicate an electrical issue affecting the voltage regulator’s performance. Replace any blown fuses with ones of the correct rating.
Use a Multimeter for Continuity Checks: For less obvious issues, a multimeter set to the continuity test mode can help identify breaks in wires or faulty connections. This step is crucial for wires that look intact but may have internal breaks.
Inspect the Ground Connections: A faulty ground connection can lead to various electrical problems, including those involving the voltage regulator. Ensure that all ground points are clean, tight, and free from rust or corrosion.
Tighten and Clean Connections: Once any loose connections are identified, tighten them securely. If corrosion is present, disconnect the battery before cleaning the terminals and connectors with a wire brush or an appropriate cleaning solution.
Replace Damaged Components: If any components are worn or damaged beyond repair during the inspection, it’s important to replace them. Use only recommended replacements to ensure compatibility and reliability. This includes wiring, connectors, and even the voltage regulator itself if it’s determined to be faulty.
Following these diagnostic steps can often resolve underlying issues affecting the voltage regulator’s performance. Regular maintenance and a keen eye for detail can prevent many of these problems from developing in the first place, ensuring the lawn mower’s electrical system operates smoothly and reliably.
Voltage Regulator Replacement Guidelines in Lawnmowers
When the time comes to replace a faulty voltage regulator or any other component within the lawn mower’s electrical system, following the manufacturer’s guidelines is not just recommended; it’s essential for ensuring the longevity and safety of the mower. Here are the steps and considerations to ensure a successful replacement:
Consult the Manufacturer’s Manual: Thoroughly review the manual before starting any replacement process. This resource contains crucial information about the parts and procedures recommended for your lawn mower model.
Gather the Appropriate Tools: Ensure you have all the necessary tools for the job as outlined in the manual. Using the wrong tools can cause damage to the new component or the mower itself.
Purchase Genuine Replacement Parts: Opt for genuine parts or those the manufacturer approves. While aftermarket parts might be cheaper, they may not meet the specifications for optimal performance, potentially leading to further issues.
Power Off and Disconnect the Battery: Safety first. Always ensure the lawn mower is turned off and the battery disconnected before attempting any replacements to avoid the risk of electric shock.
Remove the Faulty Component: Following the manual, carefully remove the faulty voltage regulator, taking note of its orientation and connection points. This is crucial for the smooth installation process of the new component.
Install the New Voltage Regulator: Place the new voltage regulator in the same position as the old one, ensuring it fits securely. Reconnect it following the exact procedure and wiring order as before. This step is critical to avoiding short circuits or malfunctions.
Reconnect the Battery and Test: Once the new regulator is in place, reconnect the battery and start the mower to test the functionality of the new component. Check the battery voltage with the engine off and running to ensure it’s being charged correctly.
Perform a Final Check: Make sure all connections are secure and no loose tools or parts are left in the working area. It’s also a good opportunity to check around the mower for any other potential issues.
Dispose of the Old Component Responsibly: Consider the environment and dispose of the old voltage regulator and any other replaced parts in an environmentally friendly way. Many auto parts stores offer recycling services for automotive and lawn mower components.
Following these guidelines ensures not only a successful replacement of the voltage regulator but also maintains the integrity and performance of the lawn mower. Adhering to the manufacturer’s instructions and using genuine parts helps extend the mower’s life, providing reliable service for years.
Extensive Recommendation: Protecting Voltage Regulators of LawnMowers
Maintaining a regular maintenance schedule is essential to ensuring that a lawn mower’s electrical system, especially the voltage regulator and battery, lasts long and functions at its best. To effectively maintain these essential elements, consider the following extensive recommendations:
Cleanliness is Key: Dirt and debris are big no-nos for your mower’s electrical parts. Regularly clean debris from the voltage regulator and battery using a soft brush or a dry cloth. If you encounter stubborn dirt, a gentle cleaner safe for electrical bits will do the trick. Spot any corrosion? Make a mixture of water and baking soda, scrub gently, rinse, and dry well before reconnecting.
Stay Dry: Water and electrical components don’t mix. After cleaning, ensure everything’s bone dry to avoid shorts or rust. Also, when your mower is off-duty, especially during the off-season, keep it in a dry spot. If it will sit for a while, consider removing the battery to dodge discharge and corrosion.
Secure Everything: Ensure the electrical connections are tight and secure by giving them a periodic shake test. A loose wire can mean trouble. Also, watch for any wear or damage on wires and connectors, replacing anything that looks iffy to keep the system solid.
Battery Basics: Secure the battery properly in its tray. If it’s the type that needs it, check and maintain the electrolyte levels with distilled water.
Regular Check-Ups: Fold in checks of the electrical system into your routine maintenance. This means visually inspecting the voltage regulator, battery, and wires and regularly testing the battery voltage and the charging system’s performance. And don’t wait for a breakdown to swap out aging parts; staying ahead with replacements can save you headaches and cash down the line.
By following these guidelines for cleanliness, dryness, security, and routine checks, you can avoid many common problems with your mower’s voltage regulator and battery. This preventive maintenance ensures that your mower is dependable and long-lasting.
Frequently Asked Questions (FAQs)
What is a voltage regulator on a lawn mower, and why is it important?
The voltage regulator on a lawn mower is a crucial component that regulates the charging system’s output voltage, ensuring it does not exceed safe levels and protecting the electrical system.
How can I test a voltage regulator on a lawn mower?
To test a voltage regulator on a lawn mower, you can use a multimeter to measure the voltage output and check for any irregularities that may indicate a faulty regulator.
What are the steps to troubleshoot a faulty voltage regulator on a lawn mower?
Troubleshooting involves checking the ignition, measuring the voltage output, and ensuring the regulator terminals work properly. It’s important to note the safety precautions, such as using safety gloves and following a step-by-step approach.
When should I replace the voltage regulator on my lawn mower?
If the voltage regulator consistently provides a bad output voltage or does not regulate the voltage properly, then it needs to be replaced to avoid damaging the electrical components of the lawn mower.
What are the signs of a faulty voltage regulator on a lawn mower?
A faulty voltage regulator may cause issues such as a dead battery, erratic operation of electrical components, or overcharging of the battery when the mower is running.
How do I measure the voltage output of a lawn mower’s voltage regulator?
You can use a voltmeter to check the regulator’s battery voltage and DC voltage output to determine if it’s within the expected range.
What safety precautions should I take when testing a voltage regulator on a lawn mower?
It’s typically recommended to wear safety gloves, ensure the mower is turned off, and disconnect the battery’s negative lead before testing the regulator to avoid any electrical accidents.
Conclusion
With this knowledge, you can ensure that your lawn mower runs smoothly and effectively by addressing voltage regulator issues. These testing and troubleshooting techniques are invaluable for maintaining your mower’s electrical health and saving time and resources. We encourage you to apply these strategies and share your outcomes or queries. Thank you for investing the time to enhance your lawn mower maintenance skills.

About Naveed A Hashmi
In my childhood, I used to see my parents while working in the land, for these reasons today I have been serving the same as our own tradition and culture. I thus love to stay in it, because I want to learn something advanced and new so that I may improve my farm’s contour and help others with my experience.