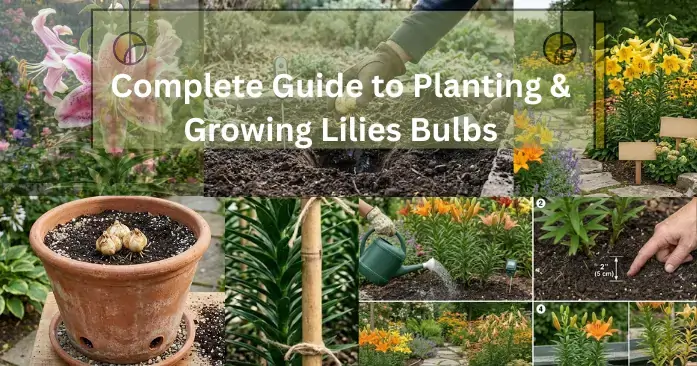
Complete Guide to Planting & Growing Lilies Bulbs
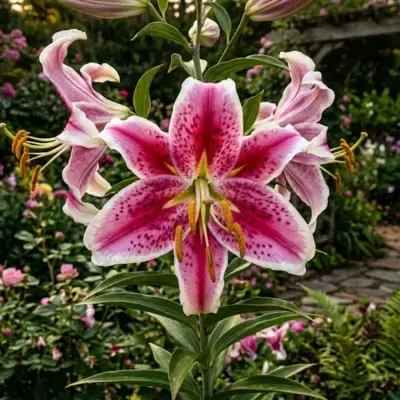
Lilies (Lilium) are one of the most rewarding plants you can add to your garden. A small investment in planting bulbs pays dividends for years with fragrant, colorful blooms that transform outdoor spaces. The Lilium family offers remarkable variety, from compact Asiatic hybrids bursting with vibrant colors to the dramatically perfumed Oriental varieties and the statuesque Trumpet types. Understanding how to select, plant, and care for these beauties ensures your garden bursts with some of the most beautiful lilies season after season.
Growing lilies from bulbs is straightforward even for beginners, yet rewarding enough for experienced gardeners seeking to expand their collection. These versatile plants thrive in garden beds, containers, and cutting gardens, providing spectacular cut flowers for indoor arrangements. Different lily varieties adapt to varying climates, including challenging regions like Southern California, though success requires matching the right variety to your specific conditions. The key lies in proper bulb selection, strategic planting timing, and providing the right care at each growth stage.
How to Plant Lily Bulbs
Plant lily bulbs immediately upon arrival whenever possible. Quality bulbs arrive fresh and firm, displaying healthy white roots. Unlike dormant tulip or daffodil bulbs, lily bulbs never fully sleep, requiring gentler handling throughout the year. Check bulbs carefully before planting, discarding any that feel soft or show signs of rot. Fresh, plump bulbs with intact root systems establish quickly and produce stronger plants with more abundant blooms.

Select a planting location matching your lily variety’s sunlight needs. Asiatic lilies flourish in full sun, producing the most intense colors when receiving at least six hours of direct light daily. Oriental lilies tolerate partial shade remarkably well, making them ideal for spots with afternoon protection from intense heat. Martagon lilies, sometimes called Turk’s cap lilies, actually prefer dappled shade and pair beautifully with hostas in woodland garden settings. Understanding these light preferences prevents common growing mistakes that lead to weak growth or sparse flowering.
Drainage determines lily success more than almost any other factor. Lilies cannot survive waterlogged soil, where bulbs quickly rot. Wet, soggy conditions genuinely kill these plants. Improve drainage by incorporating coarse sand or perlite into planting holes, or simply choose elevated beds and containers that naturally shed excess moisture. Heavy clay soils benefit tremendously from raised bed construction or strategic mounding, creating the well-drained conditions lilies demand.
Planting Lily Bulbs in the Ground
Choose a spot where lilies will receive appropriate light exposure throughout the growing season. Mark the area clearly if planting in fall, since tender spring shoots easily get accidentally damaged before emergence. Gardening boots and even careful footsteps have crushed emerging lily growth, breaking the flower-producing tips. While this damage rarely kills established bulbs, it eliminates that season’s blooms entirely.
Dig holes accommodating both the bulb and its root system comfortably. Small bulbs (less than 2 inches/5 cm in diameter) plant 3 to 4 inches (7.5-10 cm) deep, measured from the bulb top to soil surface. Larger bulbs, those exceeding 2 inches (5 cm) in diameter, require deeper placement at 4 to 6 inches (10-15 cm). Deeper planting in colder climates provides natural insulation, while shallower depths work fine in warmer regions where frost penetration is minimal.
Space bulbs 6 to 8 inches (15-20 cm) apart to allow room for mature plants to develop fully. Cluster groups of five to ten bulbs together for a more dramatic visual impact when blooming. Gently position each bulb in its hole, roots spread naturally downward, then backfill with soil. Water thoroughly after planting to settle soil around roots and eliminate air pockets that could dry delicate root tissue.
Planting Lilies in Pots
Containers offer excellent control over soil conditions, drainage, and placement flexibility. Select pots at least 12 inches (30 cm) deep to accommodate lily root systems comfortably. Ensure containers have adequate drainage holes, as standing water inside pots kills bulbs as surely as waterlogged garden soil. Terra cotta and ceramic pots provide stability for tall varieties but dry out faster than plastic or resin containers, requiring more frequent watering.
Use high-quality potting mix specifically designed for container growing. Garden soil alone often compacts too heavily in containers, creating the poorly drained conditions lilies cannot tolerate. Mix in coarse sand or perlite to improve drainage further, aiming for a growing medium that drains quickly yet retains enough moisture to keep roots from drying completely. Commercial bulb planting mixes work excellently for this purpose.
Plant bulbs at the same depth as garden planting, typically 4 to 6 inches (10-15 cm) from top to bottom of the bulb. Space bulbs slightly closer in containers than garden beds, about 4 to 6 inches (10-15 cm) apart. Position containers where they receive appropriate light for the variety—full sun for Asiatics, partial shade for Orientals. Water thoroughly and maintain consistent moisture throughout the growing season, as container soil dries faster than garden beds.
When to Plant Lily Bulbs
Fall planting suits most lily varieties best in temperate climates. Autumn allows bulbs to establish root systems during cool weather before spring growth emerges. Plant bulbs approximately six weeks before expected hard frost, giving roots time to settle before ground freezes. In regions with mild winters, late fall planting works well since bulbs won’t face damaging cold extremes.
Early spring planting succeeds in colder regions where winter ground freezing makes fall planting impractical. Spring-planted lilies establish more slowly since they must develop roots while simultaneously pushing up growth. The growing season may be slightly compressed, with blooms appearing later than fall-planted specimens. Choose this timing for purchased bulbs that arrive in spring, as waiting until the following fall risks improper storage deterioration.
Warmer climates like Southern California often plant during winter months when soil temperatures cool sufficiently. Avoid planting during hot periods when soil temperatures exceed 70°F (21°C), as this stresses bulbs attempting to establish in challenging conditions. Monitor soil temperature rather than air temperature, since soil retains heat longer and can damage sensitive root systems even when air temperatures seem acceptable.
When Do Lilies Bloom?
Bloom timing varies dramatically among lily types, spanning much of the growing season. Asiatic hybrids are earliest bloomers, flowering in early to midsummer depending on the climate zone. These varieties typically bloom 60 to 90 days after spring growth emerges, providing color when many other perennials haven’t yet peaked. Early-blooming Asiatics extend the garden’s visual interest by filling the gap between spring bulbs and mid-summer flowers.

Oriental lilies bloom midsummer to late summer, typically 90 to 120 days after growth emergence. Their peak flowering coincides with the warmest part of the growing season, when their extraordinary fragrance fills gardens most effectively. Trumpet and Aurelian hybrids often bloom late summer, sometimes continuing into early fall with staggered flower opening along tall stalks. This extended bloom succession allows planning continuous lily color by selecting varieties from each group.
Individual blooms last 5 to 7 days under good conditions, with each stalk producing multiple flowers opening sequentially over 2 to 3 weeks. Removing spent blooms promptly encourages remaining flowers to develop fully and prevents seed production that diverts energy from bulb strength. Stalks continue looking attractive even after primary blooms fade, as developing seed pods add structural interest to garden plantings.
When to Cut Back Lilies
Cut back lily foliage only after it turns completely yellow or brown naturally. Green leaves photosynthesize throughout the growing season, converting sunlight to energy that gets stored in the bulb for next year’s growth. Premature cutting removes this essential energy-production capability, weakening bulbs progressively over multiple seasons. The rule applies whether cutting for arrangements or tidying the garden.
Wait until foliage dies back completely before removal. In mild climates, this may not occur until late fall or even early winter. In colder regions, frost kills foliage back, after which removal becomes safe and appropriate. Simply pull yellowed leaves away gently, or cut stalks to ground level with clean pruners. Many gardeners leave all foliage in place through winter, removing dead material only during spring cleanup when new growth begins emerging.
Cutting lilies for cut flower arrangements requires careful technique to preserve bulb health. Take no more than one-third of the stem when harvesting blooms for indoor display. This leaves sufficient foliage for continued photosynthesis and energy production. Cutting stems excessively short eliminates too much photosynthetic tissue, preventing the bulb from gathering adequate reserves for subsequent seasons. Moderation in harvesting ensures both beautiful indoor arrangements and continued garden performance.
How to Deadhead Lilies
Deadheading spent lily blooms prevents seed production and redirects the plant’s energy toward bulb strengthening. Snap or cut off individual flowers as they fade, removing the entire spent bloom and its swollen base. Do not remove the flower stalk itself unless all buds have completed blooming. The tall stems continue producing energy through photosynthesis even after flowers disappear, so keep them in place until foliage dies back naturally.
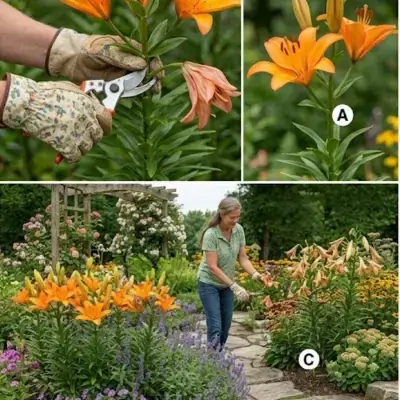
The swelling beneath spent blooms represents developing seed pods. These pods mature over several weeks, and seed formation requires considerable energy from the bulb. Removing flowers before seed set preserves that energy for the bulb, producing stronger plants and more abundant blooms the following season. The difference between deadheaded and non-deadheaded lilies becomes increasingly visible over multiple growing seasons.
Use clean, sharp scissors or pruners for deadheading tasks. Make cuts cleanly without crushing stems, which can introduce disease organisms. Some gardeners prefer snapping spent blooms off by hand, bending the flower head sideways until it separates cleanly. Either technique works, though hand-snapping sometimes tears adjacent tissue if the flower isn’t fully ready to release. Watch for broken or damaged stems during the process, cutting any damaged tissue cleanly below the affected area.
How to Look After Lilies?
Lilies require straightforward maintenance practices that yield impressive results when performed consistently. Proper watering, appropriate feeding, and support for tall varieties form the core of successful lily care. These plants reward gardeners who understand their basic needs without demanding excessive attention or complicated routines. Even minimal care produces beautiful results, while attentive gardeners enjoy increasingly spectacular displays year after year.
Watering
Lilies prefer consistent soil moisture throughout the growing season, particularly during active growth and flowering. Water deeply when rainfall is insufficient, providing about 1 inch (2.5 cm) of water weekly through rainfall or irrigation. Deep, infrequent watering develops stronger root systems than light, frequent applications. Water at soil level rather than overhead to minimize wet foliage, which encourages fungal diseases.
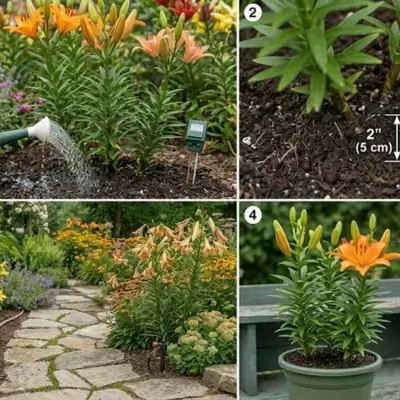
Adjust watering based on weather conditions and soil type. Sandy soils drain quickly and require more frequent irrigation, while clay soils retain moisture longer. Container lilies need watering more often than garden specimens since pots dry out faster. Check soil moisture by inserting a finger 2 inches (5 cm) deep, watering only when the soil feels dry at that depth. Wilting indicates watering needs are urgent, though consistent mild drought stress reduces overall plant health and bloom quality.
Reduce watering gradually after flowering completes. Lilies enter a post-bloom recovery period where decreased moisture signals the plant to begin storing energy in the bulb. Heavy watering at this stage encourages unnecessary top growth rather than bulb development. Maintain enough moisture to prevent complete soil drying, but shift toward drier conditions as foliage begins yellowing toward dormancy.
Feeding
Feed lilies at planting time with a balanced, slow-release fertilizer incorporated into backfilled soil. This initial feeding supports root establishment and early growth. Apply a second feeding when shoots emerge in spring, using a balanced fertilizer with slightly higher phosphorus content to support blooming. Follow product label instructions carefully, as over-fertilizing produces lush foliage at the expense of flowers.
Liquid fertilizers applied every two weeks during the growing season benefit lilies in containers. Container growing medium lacks the nutrient reservoir of garden soil, requiring more frequent nutrient replacement. Dilute liquid fertilizers to half-strength to prevent salt buildup that damages roots. Stop feeding approximately six weeks before expected first frost, giving plants time to transition toward dormancy naturally.
Organic amendments benefit garden-planted lilies when incorporated before planting. Compost improves soil structure and provides slow-release nutrients throughout the growing season. Work 2 to 3 inches (5-7.5 cm) of compost into planting beds annually, allowing earthworms and soil organisms to incorporate it naturally. This approach supplements rather than replaces fertilizer programs, enhancing overall soil health while feeding plants.
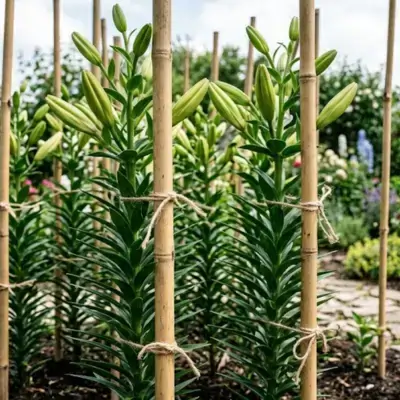
Staking
Trumpet, Aurelian, and other tall lily varieties often require staking for wind protection. Large trumpet-shaped blooms create significant sail area that catches breezes, potentially toppling entire plants. Staking prevents this damage while keeping stems straight and flowers displayed at optimal viewing height. Stakes also keep heavy flower clusters from dragging on the ground, where they might develop fungal problems.
Insert stakes at planting time to avoid damaging established roots later. Bamboo canes, metal supports, and even discreet tomato cages work well for lily support. Position stakes alongside bulbs as they grow, tying stems loosely to supports with soft twine or plant ties. Allow some natural movement rather than securing stems rigidly, which looks artificial and may restrict growth.
Group staking often looks more natural than individual plant supports. Cluster several lilies together and insert a few stakes around the planting, weaving twine between stakes to create natural-looking support. This technique works especially well for cutting gardens where multiple stalks grow together for abundant cut flower production. The support becomes nearly invisible as foliage fills in during the growing season.
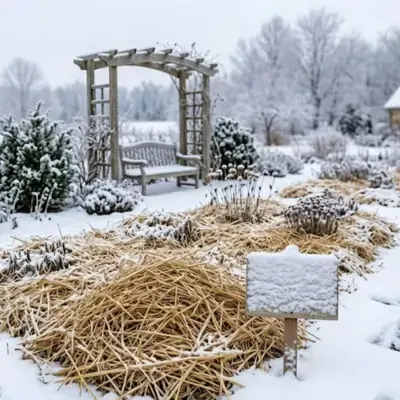
What to Do with Lilies in Winter?
Winter protection varies significantly based on climate zone and lily variety. In USDA zones 8 and warmer, lilies often remain evergreen or semi-evergreen, requiring minimal protection. Colder zones demand mulching to insulate bulbs from extreme temperature fluctuations that trigger premature growth or cause freeze damage to sensitive tissue. Understanding your specific conditions helps determine appropriate winter strategies.
Apply winter mulch after ground freezes in cold climates. This protective covering prevents repeated freeze-thaw cycles that heave bulbs from soil and damage developing roots. Use 4 to 6 inches (10-15 cm) of straw, shredded leaves, or evergreen boughs, removing it gradually in spring as temperatures warm. Remove mulch in stages over several weeks, preventing tender new growth from facing sudden temperature shocks.
Containers require extra winter attention since soil in pots freezes more deeply than garden beds. Move containers to sheltered locations against building walls or into unheated garages where bulbs experience cold but don’t face extreme temperature extremes. Alternatively, sink pots into garden soil and mulch heavily, treating container lilies similarly to garden specimens. Check container soil moisture periodically through winter, watering lightly only when soil becomes completely dry.
Reduce watering significantly during winter dormancy. Dormant bulbs require minimal moisture, and overwatering during this period encourages rot. Container plants especially suffer from excess winter moisture, so allow soil to dry between waterings and never let pots sit in water that collects in saucers. Resume normal watering schedules only when new spring growth emerges and days lengthen noticeably.
How to Divide Lilies?
Divide lilies every 3 to 5 years, or when flowering decreases noticeably. Clumps become crowded over time, with bulbs competing for nutrients and space. Division rejuvenates plantings, restoring vigor and bloom abundance. Signs that division is needed include decreasing flower size, shorter stems, and reduced overall plant health despite good care practices.
The best time for division is fall, shortly after foliage dies back naturally. Carefully dig around the entire clump, starting well away from plants to avoid accidentally slicing bulbs. Work inward gradually, loosening soil until the entire root mass can be lifted free. Shake or wash off soil to reveal individual bulbs and their offsets clearly.
Separate bulbs carefully, ensuring each division has healthy roots attached. Smaller offset bulbs may not bloom the first year after division, putting their energy into establishing strong root systems instead. Replant divisions immediately at the appropriate depth, watering thoroughly to settle soil around roots. Some lily varieties produce many offsets while others multiply slowly, affecting how frequently division becomes necessary.
Replant divided bulbs promptly at proper depths for their size. Large bulbs go 4 to 6 inches (10-15 cm) deep, small bulbs 3 to 4 inches (7.5-10 cm) deep. Space divisions 6 to 8 inches (15-20 cm) apart in amended soil with good drainage. Water deeply and apply mulch to protect newly planted divisions through their first winter, which may stress these disturbed plants more than established clumps.
Growing beautiful lilies rewards gardeners with some of the most stunning flowers in the plant kingdom. The key lies in selecting quality bulbs suited to your climate, planting them at the right depth in well-drained soil, and providing straightforward care throughout the growing season. Whether cultivating Asiatic hybrids for cutting gardens, Oriental varieties for their intoxicating fragrance, or dramatic Trumpet lilies for vertical impact, these plants deliver exceptional beauty relative to the effort required. Start with healthy bulbs, follow basic planting and care guidelines, and enjoy spectacular lily blooms for years to come.
Conclusion
Ultimately, growing lilies is an exercise in patience that yields extraordinary, long-lasting dividends. Unlike many garden plants that require replanting every year, a well-tended lily bulb becomes a lasting legacy in your landscape, returning with increasing vigor if given the respect it deserves. By mastering the core fundamentals impeccable drainage, proper planting depths, and the discipline to leave the foliage intact until it naturally fades you create an environment where these spectacular plants can truly thrive. Whether you are a novice gardener looking for a high-reward introduction to bulb planting, or an experienced green thumb curating a specific color palette and fragrance profile, lilies offer an unparalleled combination of striking architecture and enduring beauty. Plant them once, care for them thoughtfully through the seasons, and they will reward you with a breathtaking, fragrant show for years to come.